Adding WordPress pages is relatively easy. However to do it effectively to get the visibility needed by the search engines requires some special attention until it becomes intuitive. There are four basic steps to follow. They are as follows:
- Make sure you add New Page and not new Post. Posts allow comments in the WordPress framework
- Page Name – The page name ideally would match a search term. For example this page is “Adding a WordPress Pages” this would also be the search term
- Page Content – There needs to be at least 300 to 500 words to get a good index in the WordPress content with the search engines
- Page Images – When adding images to to WordPress pages these are three of the most important steps to follow:
- Size the image height and width before adding it to the web page. A common recommended maximum size by height and width is 1200px x 1200px.
- Convert the image to WEBP format to reduce the size in bytes of the image. WEBP format reduces the byte size of the image without losing any resolution to the picture. This can be done easily at CloudConvert. It is free to convert five images a day with no signup and 25 images for free signup. If you start with a JPG file as opposed to PNG or TIFF file the results of the reduced image size seem to be much better.
- Make sure you fill out the Alternate Text and the Title Attributes of the image when you add it to the WordPress media library. The Alternate Text and Title can be the same. Then fill out the description. The description should describe the picture well and the title should do the same. These items are picked up by the search engines and are indexed with the picture.
Once you have finished the page click the button in the Upper right corner.
After the page is Published click on the View Page that appears in the lower right hand corner and review your work. This seems like such a benign step however it is very important to verify the page lays out the way you like. Your content is satisfactory and the pictures if any are displayed to your satisfactory. Getting into the habit of viewing after every edit will save work down the road in maintenance and upkeep.
Adding WordPress Pages to the Site – The Menu Editor
Now that your page is finished you will more than likely need to add it to the navigation menu. If you do this upon completion of the page it will be the top page in your Menu Editor. These are the steps:
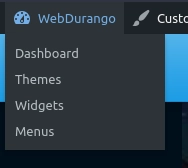
- If you are looking at the home page in the WordPress Admin Dashboard mouse over the website name and select Menus
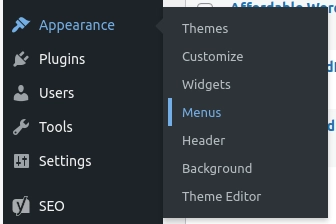
If you are already in the Dashboard select Appearance > Menus
2. From the Menu editor you should see the new page listed at the top of the pages. Check the checkbox then click Button
- From here mouse over the new page link to the right then hold down the left mouse button and drag it to where you want it placed in the menu
- Once that is done click the button then view the page and verify your link.